How to add a custom notification bar on Shopify theme
Based on my experience while working with Shopify theme, most of them has ability to show/hide Header bar / Top bar / Notification bar. This element is very necessary, it helps you display useful and relevant information to their online shoppers. Today, in this tutorial, I would like to show you how to add a simple one without any app.
How to add a custom notification bar on Shopify theme
Step 1: Add a new theme snippet
The very first step adding new snippet to your theme. From Shopify Dashboard, navigate to your Theme editor

Add new section with name ecg-top-bar
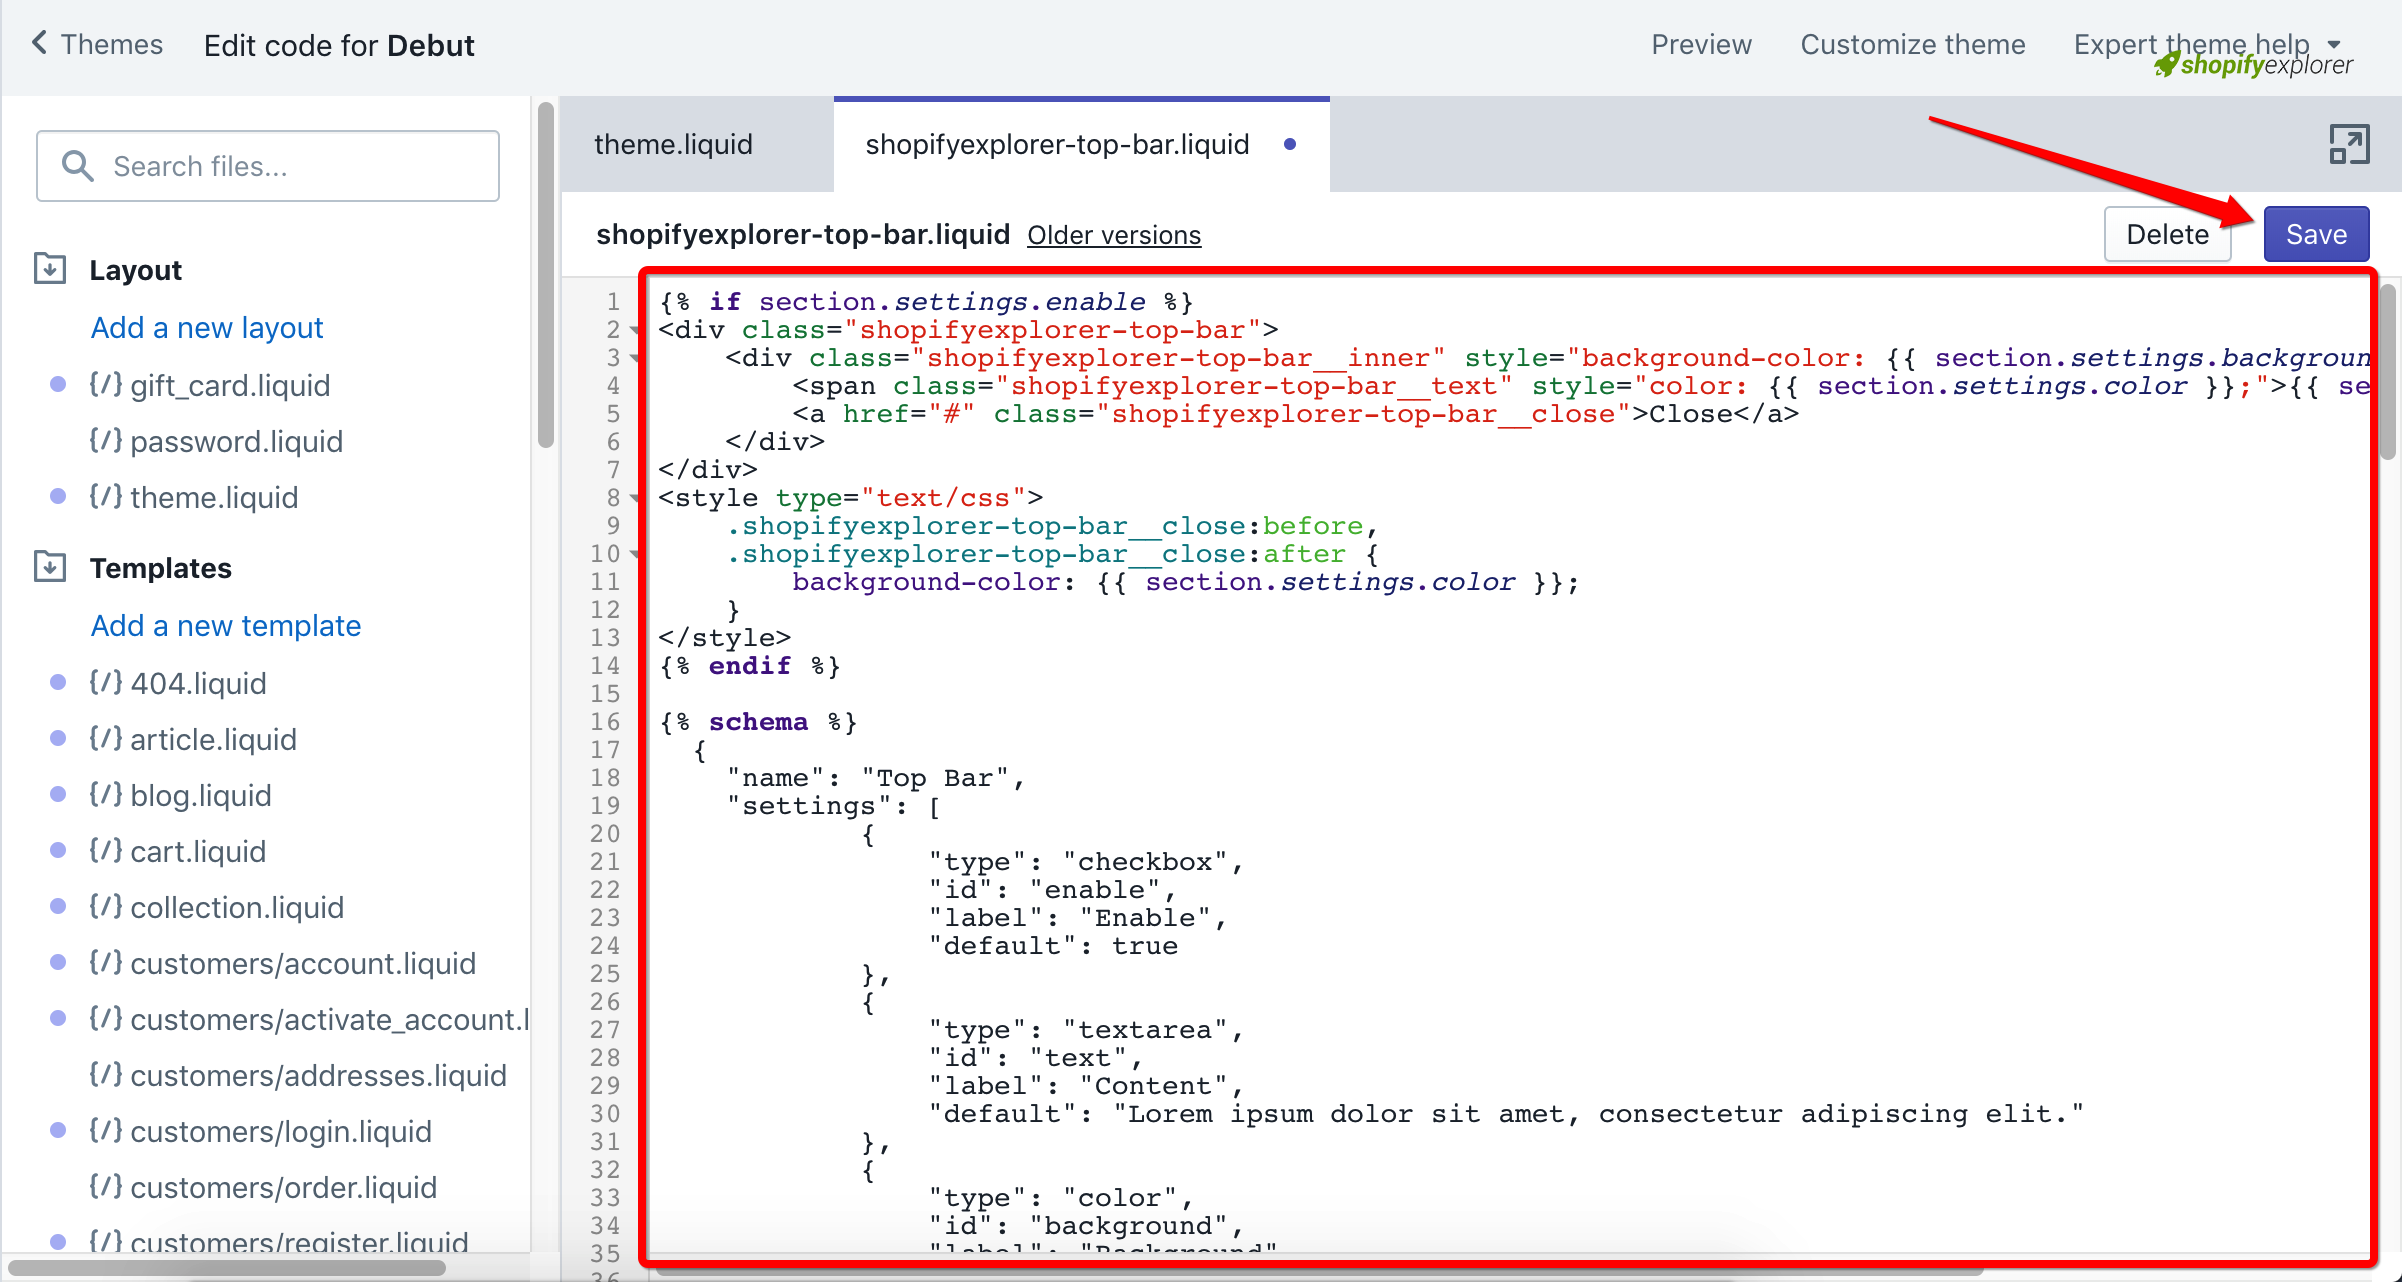
Like this screenshot bellow:

After hit Create Section, paste the following content into into it:
{% if section.settings.enable %}
    <div class="shopifyexplorer-top-bar">
        <div class="shopifyexplorer-top-bar__inner" style="background-color: {{ section.settings.background }};">
            <span class="shopifyexplorer-top-bar__text" style="color: {{ section.settings.color }};">
                {{ section.settings.text }}
            </span>
            <a href="#" class="shopifyexplorer-top-bar__close">Close</a>
        </div>
    </div>
    <style type="text/css">
      .shopifyexplorer-top-bar__close:before, .shopifyexplorer-top-bar__close:after {
        background-color: {{ section.settings.color }};
      }
    </style>
{% endif %}
{% schema %}
{
  "name": "Top Bar",
  "settings": [
    {
      "type": "checkbox",
      "id": "enable",
      "label": "Enable",
      "default": true
    },
    {
      "type": "textarea",
      "id": "text",
      "label": "Content",
      "default": "Lorem ipsum dolor sit amet, consectetur adipiscing elit."
    },
    {
      "type": "color",
      "id": "background",
      "label": "Background",
      "default": "#fff"
    },
    {
      "type": "color",
      "id": "color",
      "label": "Text Color",
      "default": "#000"
    }
  ]
}
{% endschema %}
{% stylesheet %}
    .shopifyexplorer-top-bar {
    border-bottom: 1px solid #e8e9eb;
    position: fixed;
    top: 0;
    left: 0;
    width: 100%;
    z-index: 9999;
    opacity: 0;
    visibility: hidden;
    -webkit-transform: translate3d(0, -10px, 0);
    -moz-transform: translate3d(0, -10px, 0);
    -ms-transform: translate3d(0, -10px, 0);
    -o-transform: translate3d(0, -10px, 0);
    transform: translate3d(0, -10px, 0);
    -webkit-transition: all linear 0.3s;
    -moz-transition: all linear 0.3s;
    -ms-transition: all linear 0.3s;
    -o-transition: all linear 0.3s;
    transition: all linear 0.3s;
    }

    .shopifyexplorer-top-bar.active {
    opacity: 1;
    visibility: visible;
    -webkit-transform: translate3d(0, 0, 0);
    -moz-transform: translate3d(0, 0, 0);
    -ms-transform: translate3d(0, 0, 0);
    -o-transform: translate3d(0, 0, 0);
    transform: translate3d(0, 0, 0);
    }

    .shopifyexplorer-top-bar__inner {
    position: relative;
    text-align: center;
    padding: 10px 20px;
    }

    .shopifyexplorer-top-bar__text {
    font-size: 14px;
    }

    /* Close Icon */
    .shopifyexplorer-top-bar__close {
    position: absolute;
    right: 20px;
    top: 50%;
    -webkit-transform: translate3d(0, -50%, 0);
    -moz-transform: translate3d(0, -50%, 0);
    -ms-transform: translate3d(0, -50%, 0);
    -o-transform: translate3d(0, -50%, 0);
    transform: translate3d(0, -50%, 0);
    width: 14px;
    height: 14px;
    opacity: 0.9;
    text-indent: -9999px;
    }

    .shopifyexplorer-top-bar__close:hover {
    opacity: 1;
    }

    .shopifyexplorer-top-bar__close:before, .shopifyexplorer-top-bar__close:after {
    position: absolute;
    left: 15px;
    content: ' ';
    height: 15px;
    width: 1px;
    }

    .shopifyexplorer-top-bar__close:before {
    -webkit-transform: rotate(45deg);
    -moz-transform: rotate(45deg);
    -ms-transform: rotate(45deg);
    -o-transform: rotate(45deg);
    transform: rotate(45deg);
    }

    .shopifyexplorer-top-bar__close:after {
    -webkit-transform: rotate(-45deg);
    -moz-transform: rotate(-45deg);
    -ms-transform: rotate(-45deg);
    -o-transform: rotate(-45deg);
    transform: rotate(-45deg);
    }
{% endstylesheet %}
{% javascript %}
function Shopifyexplorer_setCookie (name, value, days) {
  var expires = ''
  if (days) {
    var date = new Date()
    date.setTime(date.getTime() + (days * 24 * 60 * 60 * 1000))
    expires = '; expires=' + date.toUTCString()
  }
  document.cookie = name + '=' + (value || '') + expires + '; path=/'
}

function Shopifyexplorer_getCookie (name) {
  var nameEQ = name + '='
  var ca = document.cookie.split(';')
  for (var i = 0; i < ca.length; i++) {
    var c = ca[i]
    while (c.charAt(0) == ' ') c = c.substring(1, c.length)
    if (c.indexOf(nameEQ) == 0) return c.substring(nameEQ.length, c.length)
  }
  return null
}

var cookiesName = 'Shopifyexplorer_topBar'
if (!Shopifyexplorer_getCookie(cookiesName)) {
  var topBarEl = document.querySelector('.shopifyexplorer-top-bar')
  if (topBarEl) { topBarEl.classList.add('active') }
}
var closeEl = document.querySelector('.shopifyexplorer-top-bar__close')
if (closeEl) {
  closeEl.addEventListener('click', function (e) {
    e.preventDefault()
    Shopifyexplorer_setCookie(cookiesName, true, 365)
    topBarEl.classList.remove('active')
  })
}
{% endjavascript %}
Like the screenshot bellow:

Hit Save to save section code
Step 2: Include recently added section to theme.liquid file
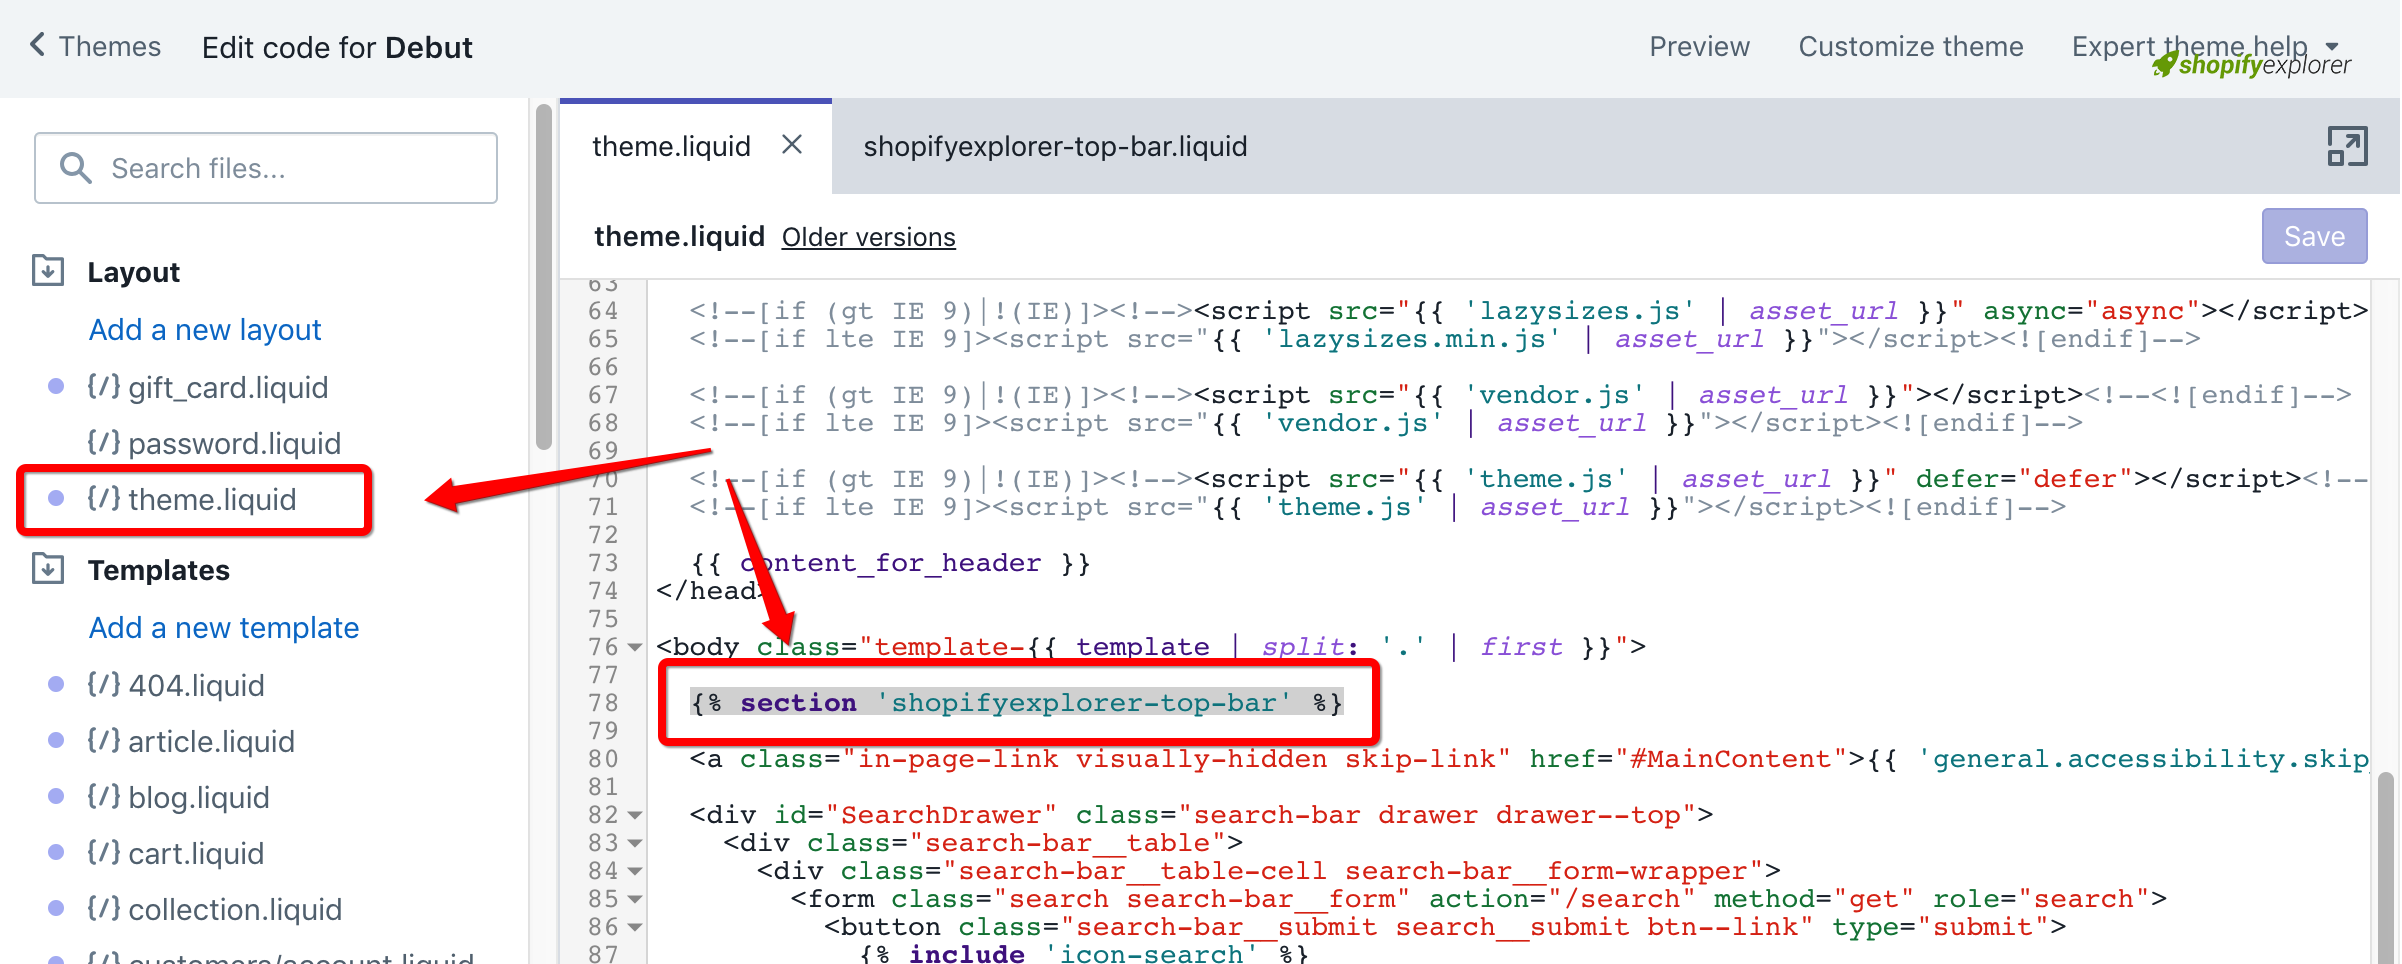
Open your theme.liquid file, scroll down to bottom. add this code just after open body tag
{% section 'shopifyexplorer-top-bar' %}Like this screenshot bellow

Hit Save to save theme file
Step 3: Config your Top Bar section
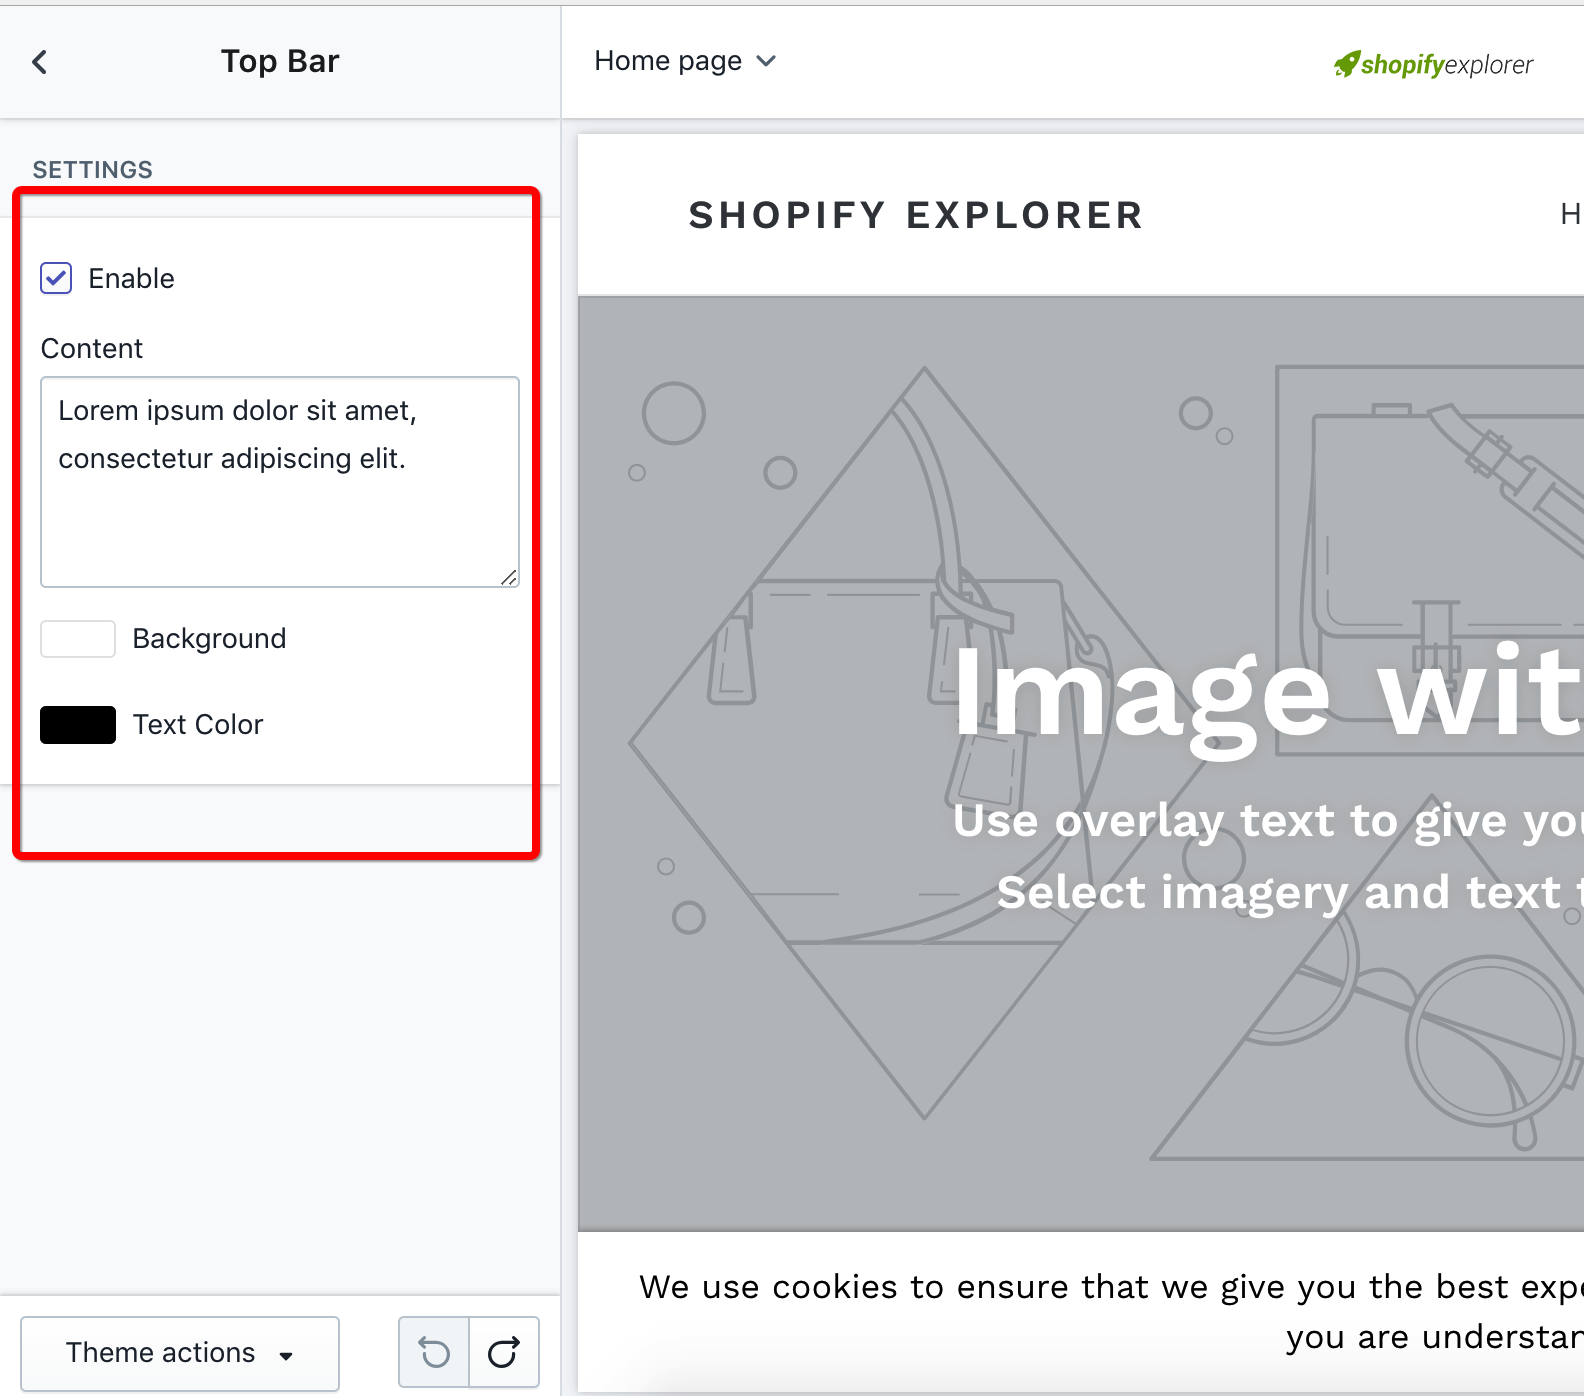
Now, open your theme customizer by hitting on Customize theme button at the very top right theme editor screen

Look for Top Bar section, click on it and change its settings, including: Enable, Text, Background and Text color
Edit to your own content

Conclusion:
That’s all, you can see my live theme example here. Hope that my detail tut can help you a little in launching your shop. Please fell free to contact me if you have any issue in trying this.
Thank you all for reading my tutorial. If you like it, share it to your friends and don’t forget to help me a bit by clicking ads to helps me maintain this site.

