
How to add lazy load image to Shopify theme
Do you want to lazy load images in Shopify? Lazy Loading allows your store to only load images when a user scrolls down to the specific image or loading a very small image on page load. In this article, I will show you how to easily lazy load images in Shopify.
Why Lazy Load Images in Shopify?
No one likes slow websites. A study conducted by Strangeloop found that a 1 second delay in page load time can lead to 7% loss in conversions, 11% fewer page views, and 16% decrease in customer satisfaction.
Images take the most time to load on your website compared to anything else. If you add a lot of images to your products, pages or articles, then each image increases your page load time.
How to add lazy load image to Shopify theme
1. Download lazy loading lib
In this tutorial, I will use Lazysizes – A high performance and SEO friendly lazy loader for images. This jQuery lib is used for default Shopify theme Debut too.
And the most thing I liked is lazysizes supports all browsers, that support document.getElementsByClassName (== all browsers but not IE8-). In case you need to support IE8, see also the noscript extension (or use a modified noscript pattern or the LQIP pattern).
If you currently have a node setup for theming, you can install this plugin via npm, by running:
npm install lazysizes --saveor using bower
bower install lazysizes --saveor download this script file. Upload it into your theme /assets folder
2. Add the lazysizes.min.js plugin file to your theme
Then in your theme.liquid file, include this line into your theme header (before closetag)
<!--[if(gt IE 9)|!(IE)]><!--><script src="{{ 'lazysizes.min.js' | asset_url }}" async="async"></script><!--<![endif]-->
<!--[if lte IE 9]><script src="{{ 'lazysizes.min.js' | asset_url }}"></script><![endif]-->
3. Edit images tag in your theme
To init this lazyload lib, you just need to add the class "lazyload" to your images/iframes in conjunction with a data-src and/or data-srcset attribute. Optionally you can also add a src attribute with a low quality image:
The bellow is snippet what I often do.
{% assign img_url = image_object | img_url: '1x1' | replace: '_1x1.', '_{width}x.' %}
<img class="lazyload fade-in"
 src="{{ image_object | img_url: '300x' }}"
 data-src="{{ img_url }}"
 data-widths="[540, 720, 900, 1080, 1296, 1512, 1728, 1944, 2048]"
 data-aspectratio="{{ image_object.aspect_ratio }}"
 data-sizes="auto"
 data-parent-fit="contain"
 alt="{{ image_object.alt | escape }}">
In this snippet variable image_object will be replaced by current editing image object.
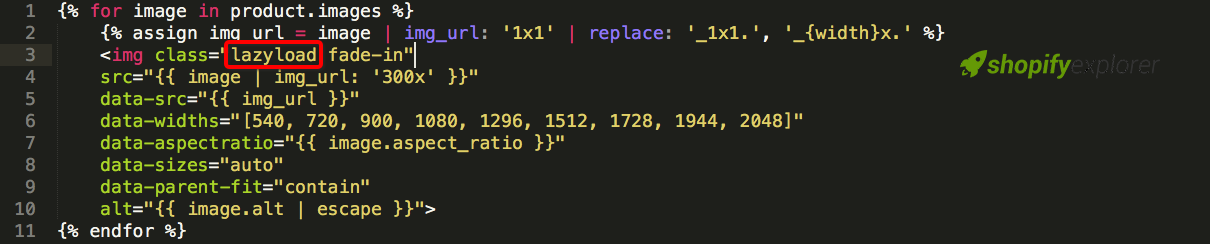
For example in product images, I’ll use
{% for image in product.images %}
 {% assign img_url = image | img_url: '1x1' | replace: '_1x1.', '_{width}x.' %}
 <img class="lazyload fade-in"
 src="{{ image | img_url: '300x' }}"
 data-src="{{ img_url }}"
 data-widths="[540, 720, 900, 1080, 1296, 1512, 1728, 1944, 2048]"
 data-aspectratio="{{ image.aspect_ratio }}"
 data-sizes="auto"
 data-parent-fit="contain"
 alt="{{ image.alt | escape }}">
{% endfor %}
A small tip here, using when you have first image in forloop or loading first featured image in product page. Add class** lazypreload** to that image.
Conclusion:
Hope that my detail tut can help you a little in launching your shop.
This tutorial is just showing you how to add lazyload function in general, in another article, I will show you how I add it detailed and a specific theme. Thank you all for reading my tutorial.
If you have any suggestion or edit, please comment and give me some advice. I am always happy to hear from you.